Click to scroll to each section
For instructions about installation, follow this link:
Enabling Atlux, activating the license from FAB, and logging in.
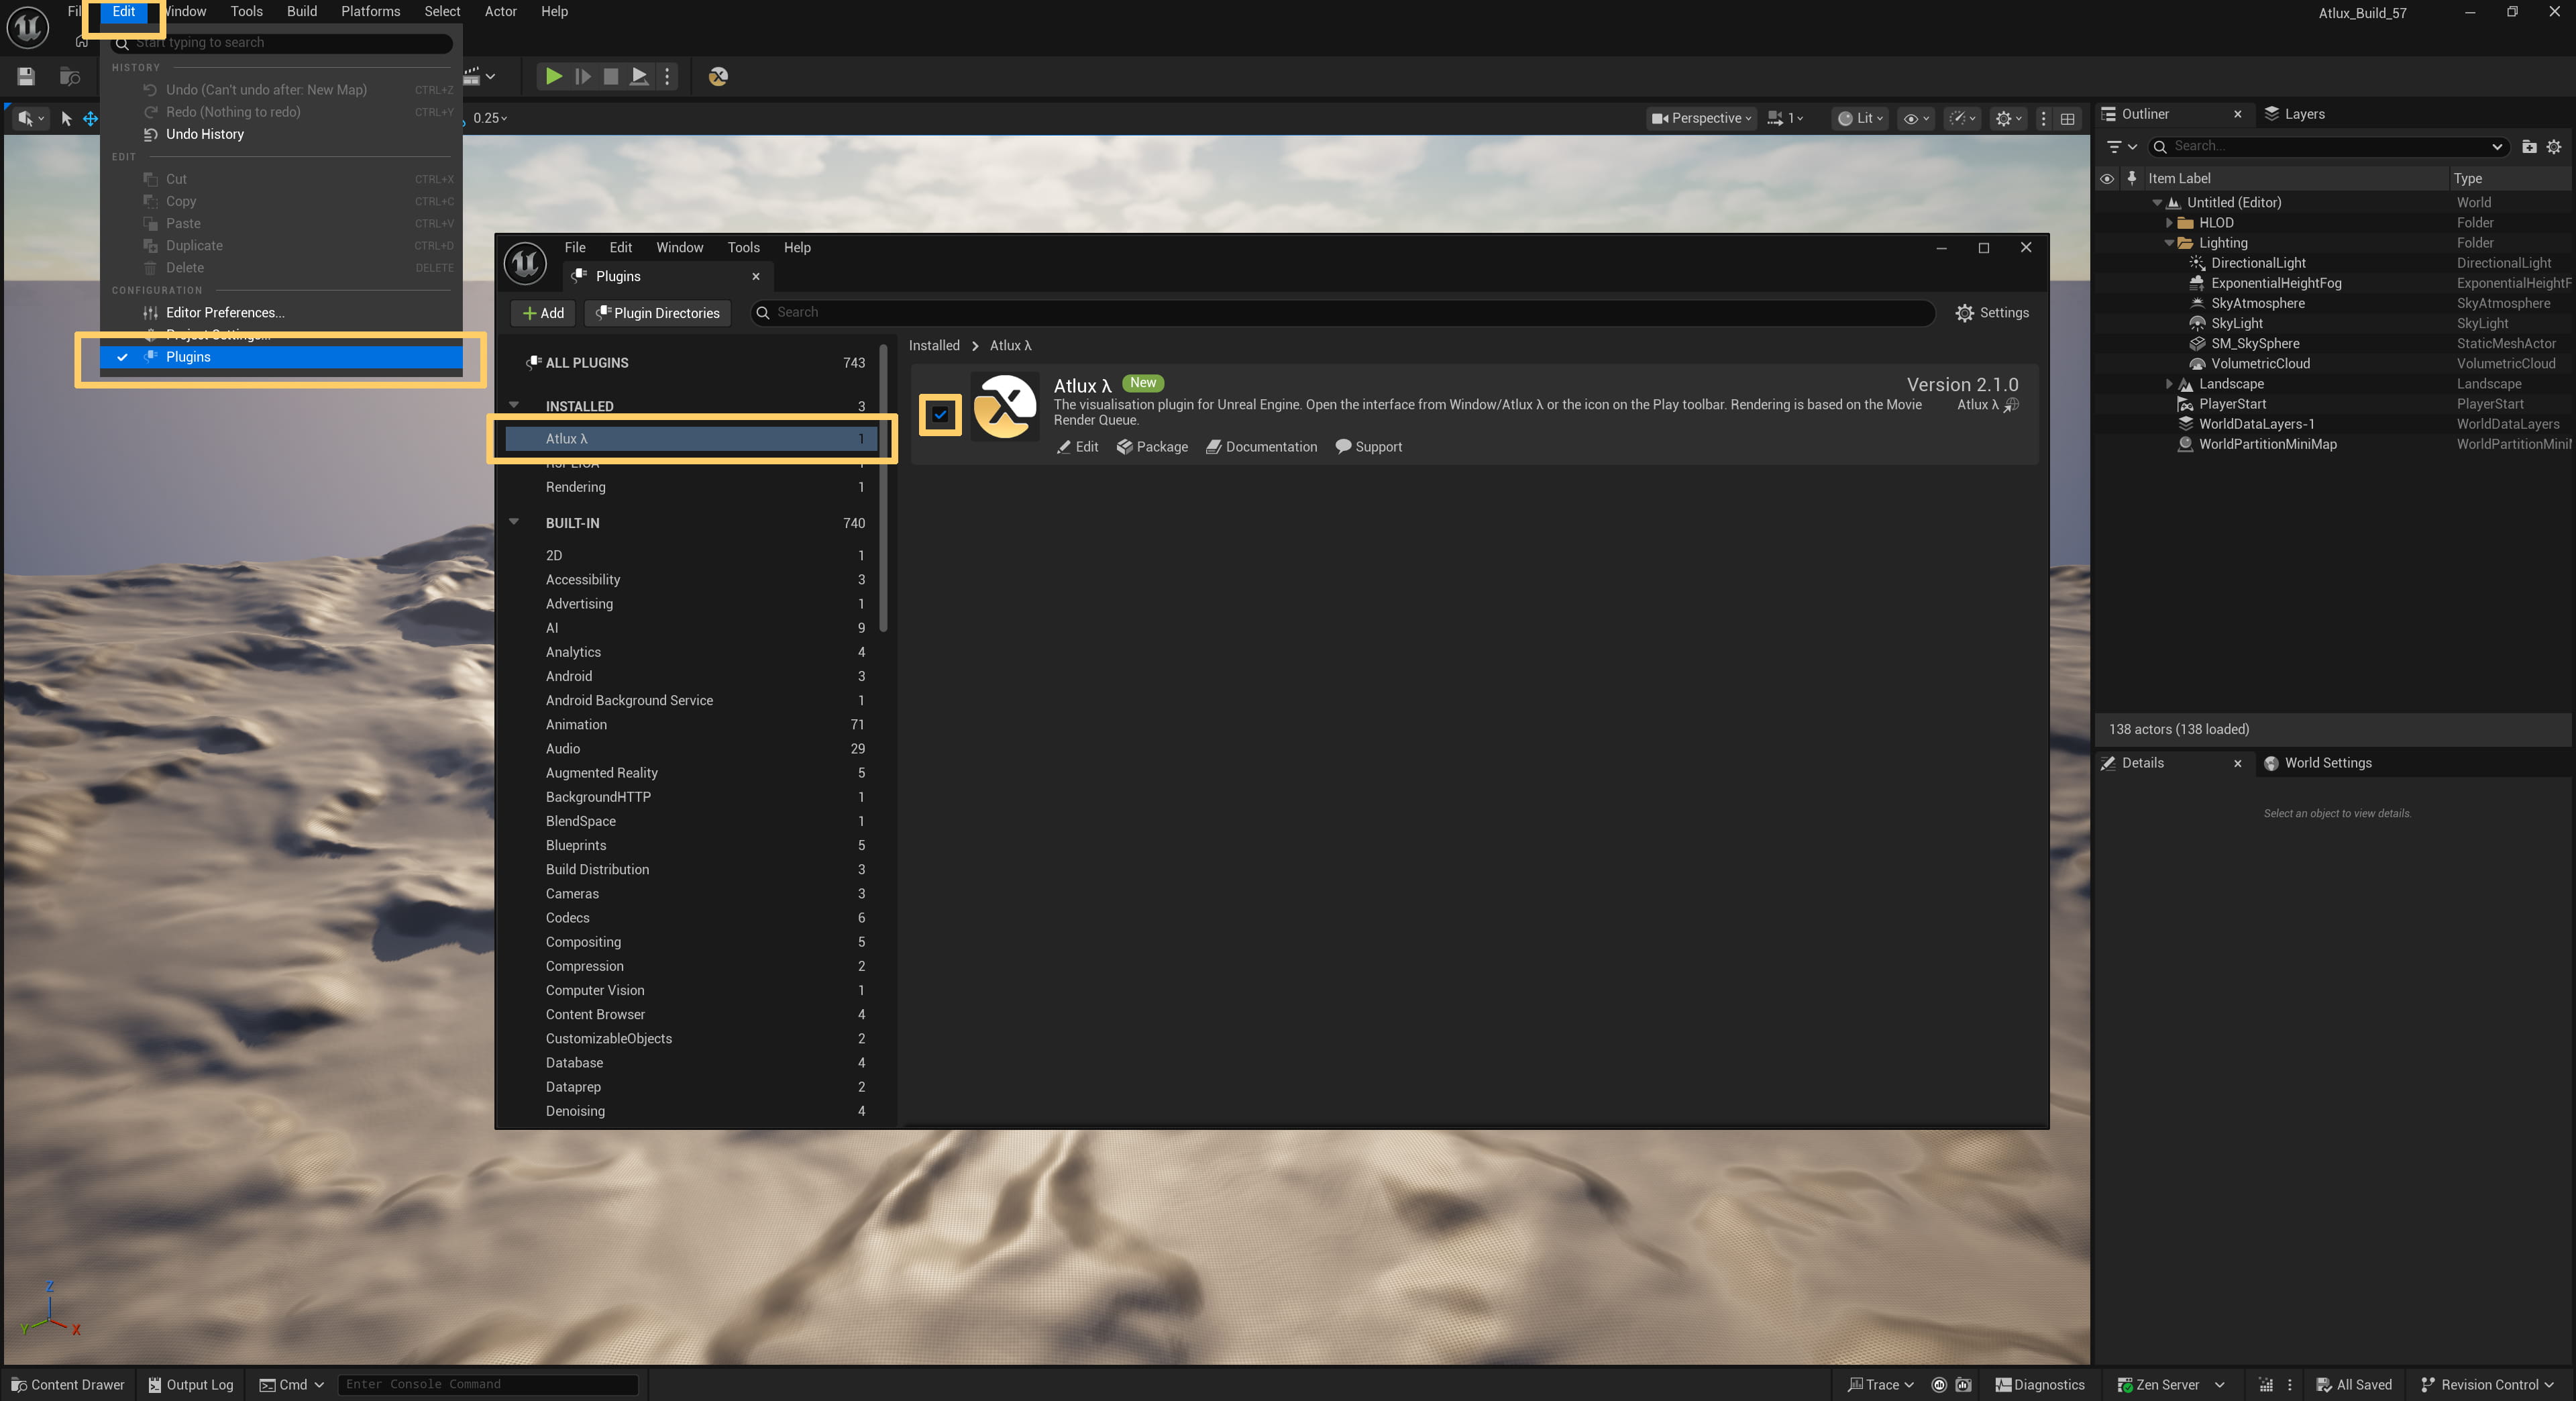
After installing the plugin via the installer or the Epic Games Launcher, go to Edit/Plugins in your project. Search for Atlux, and enable the checkbox on the left.
The Editor will need to restart after this.
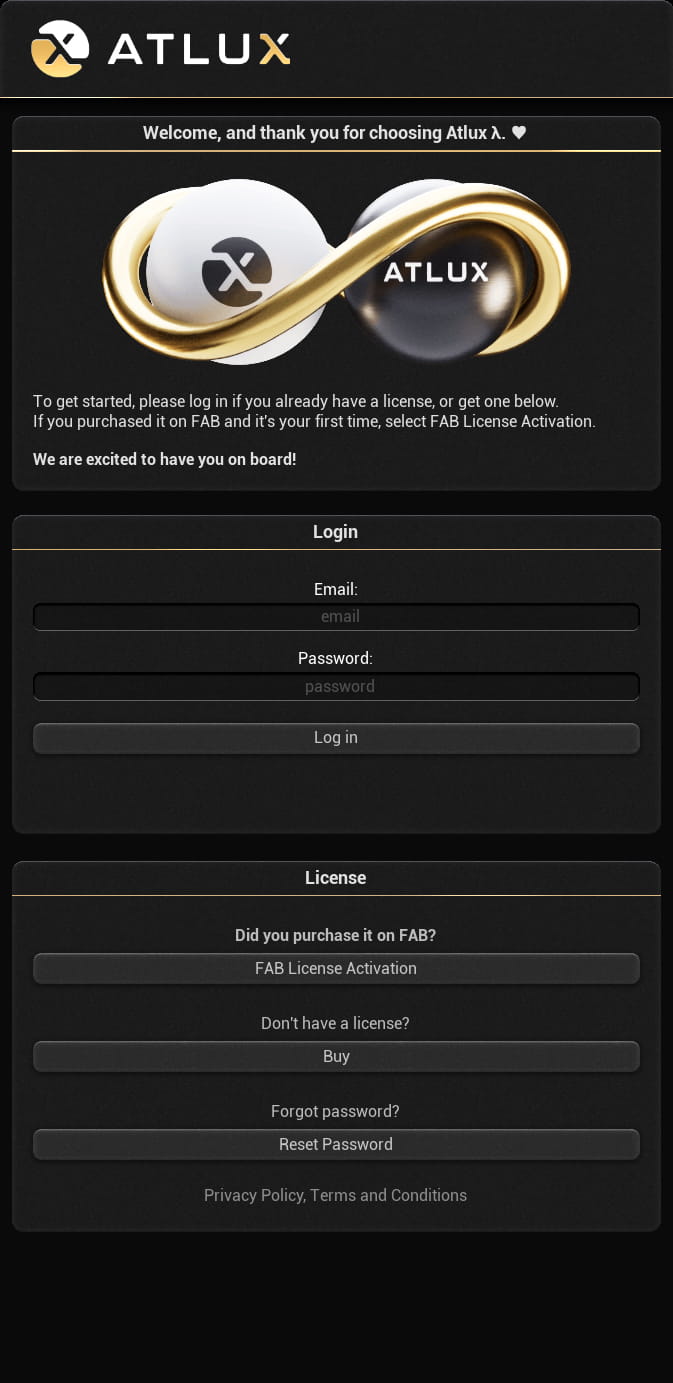
If you have already activated your license from FAB, or have purchased the plugin via the website, simply fill in your email and password and Log In.
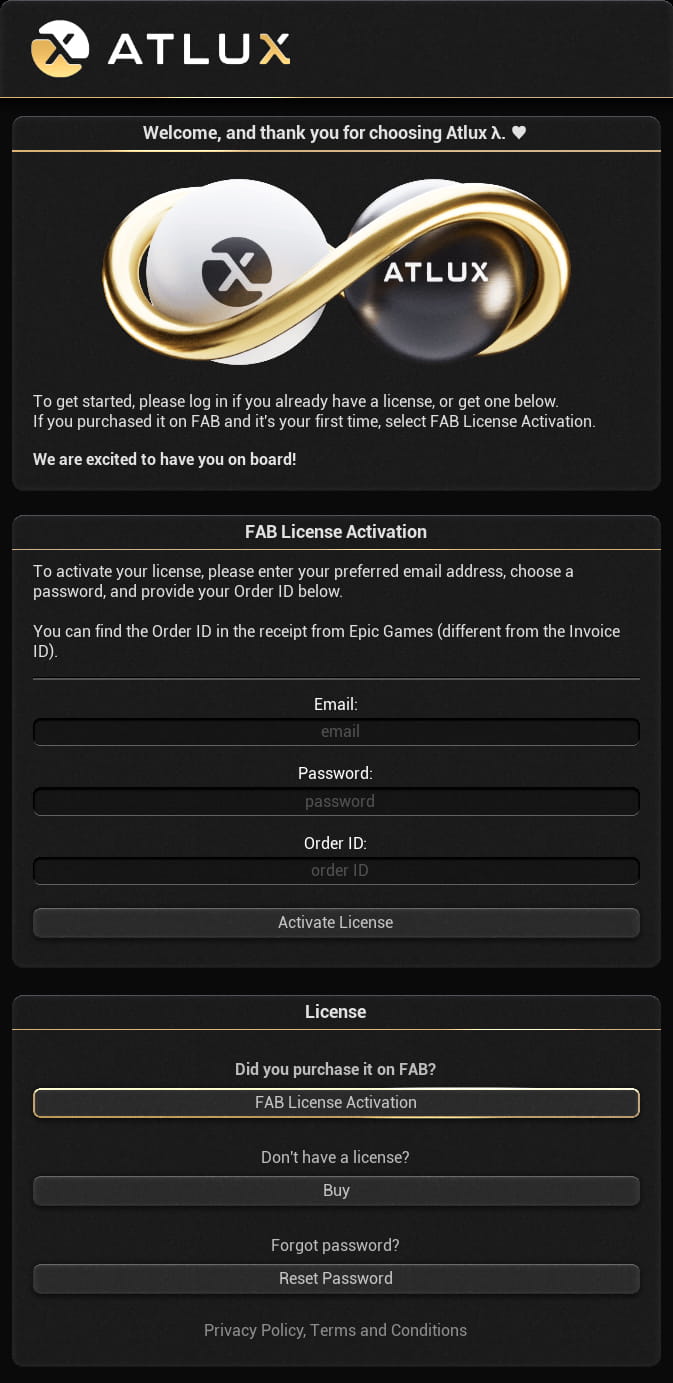
If you purchased the plugin on FAB and this is your first time using Atlux, click on FAB License Activation. Then enter your preferred email address, choose a password, and provide your Order ID, which you can find in your Epic Games receipt email or in your FAB purchase history.
You will be logged in instantly, and a confirmation email will be sent to your inbox.
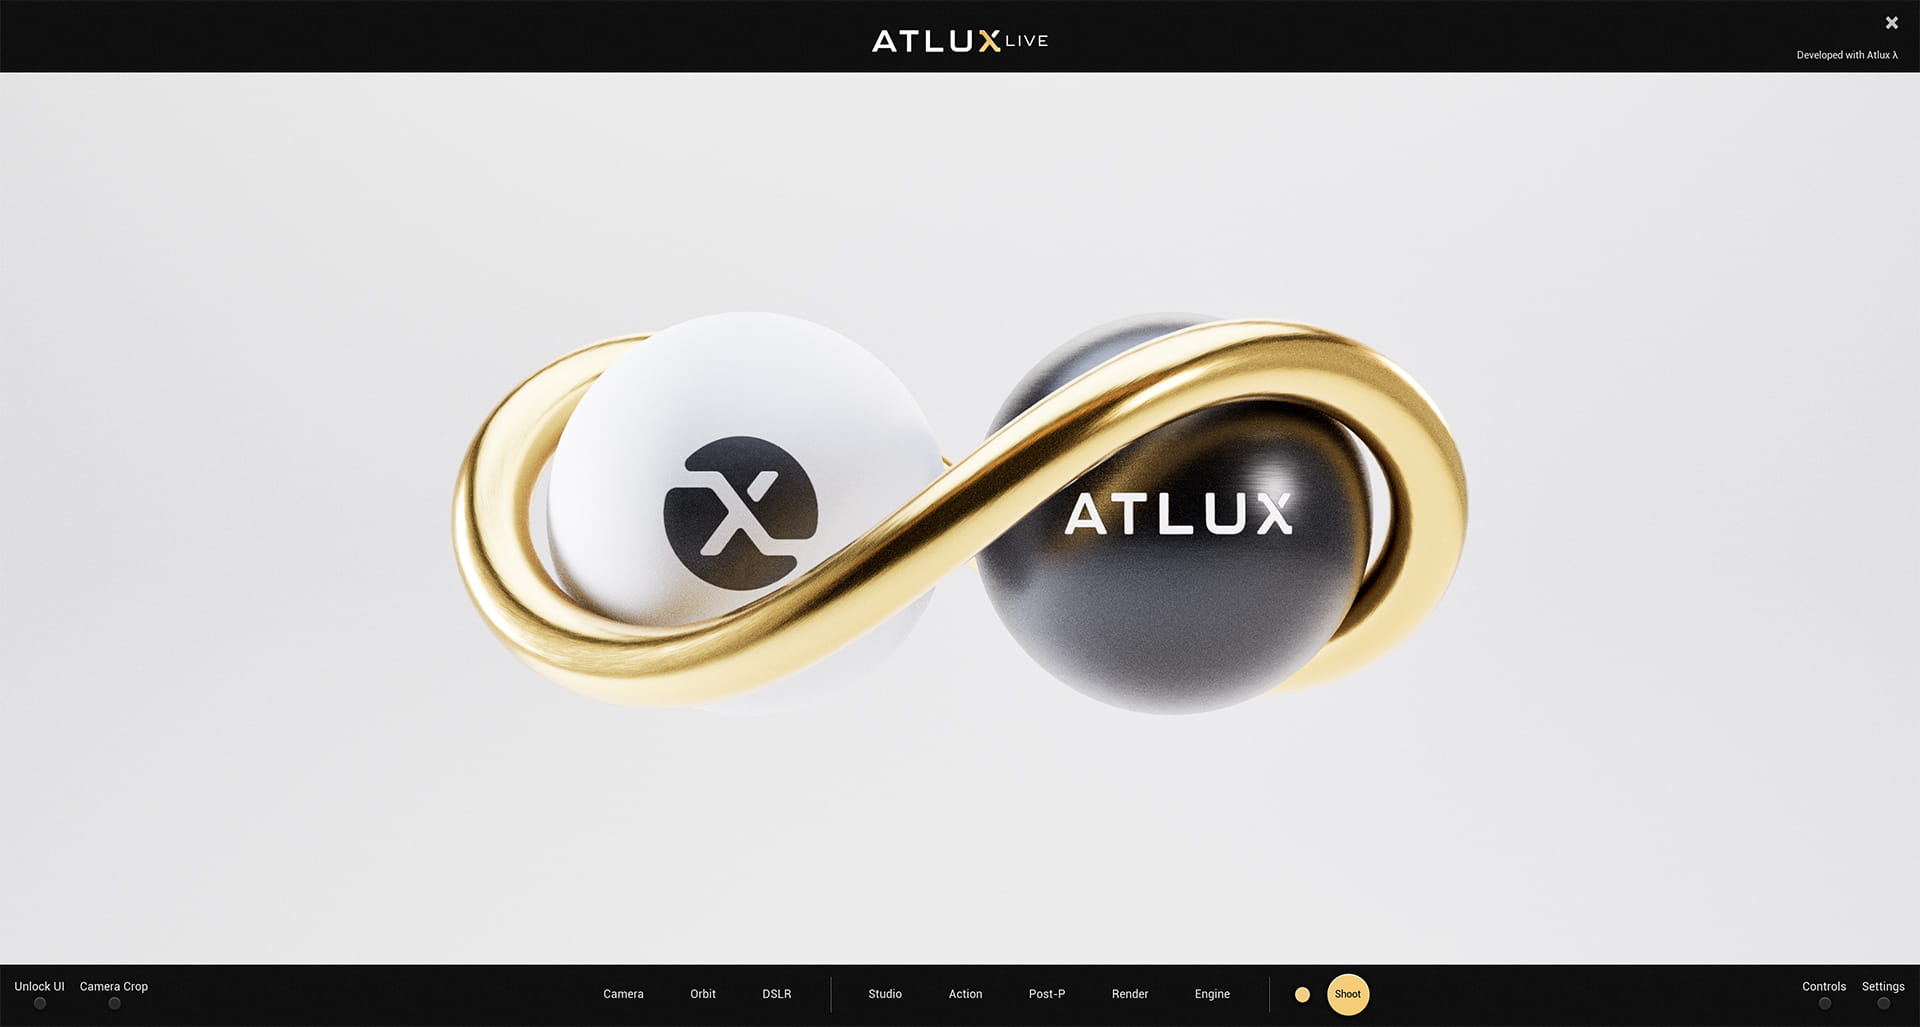
Assets, presets, quick functions, easy render settings and a 1-click render button.
Below on the left is a representation of Atlux's interface inside Unreal Engine.
Scroll down to go through all the sections.
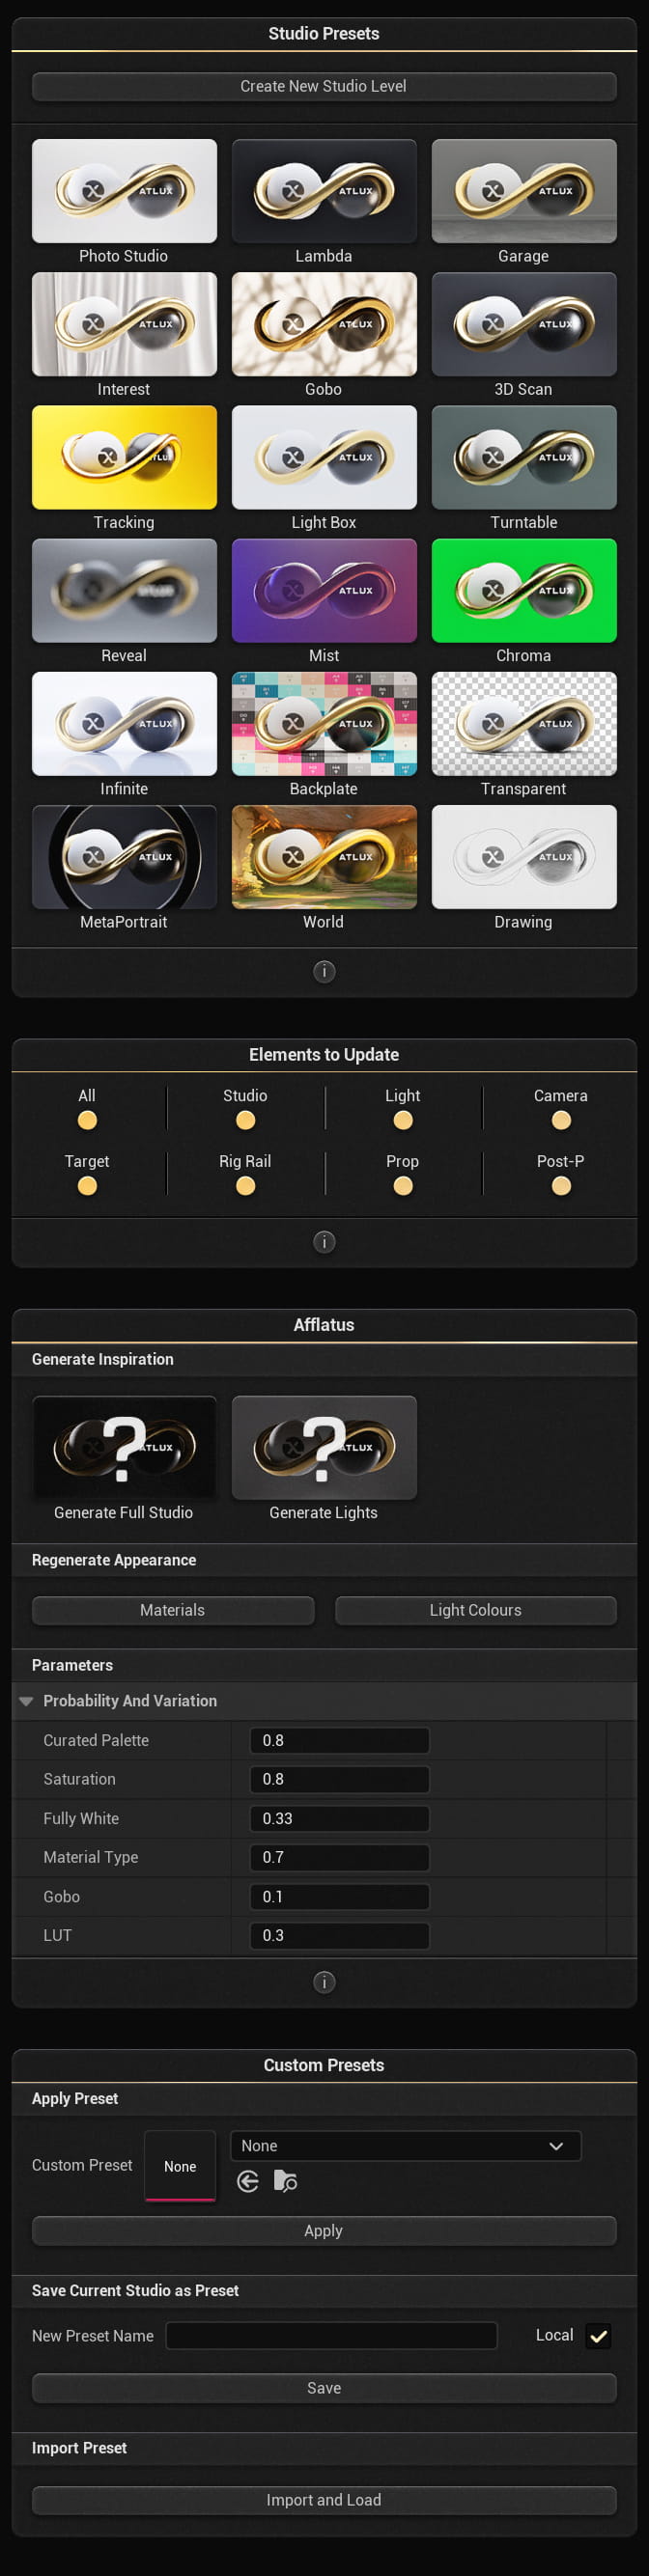
The Studio Presets section lets you instantly reconfigure the current studio using predefined setups.
Creates a new dedicated studio level with a default Atlux Studio actor and required dependencies.
Use this when starting a new scene, resetting a heavily modified studio, or creating variations across multiple levels.
Each preset updates the current studio based on the selected Elements to Update (see Section 2).
| Preset | Description |
|---|---|
| Photo Studio | Neutral studio with balanced key, fill, and rim lighting. Ideal for product rendering. |
| Lambda | Signature Atlux lighting aesthetic. Designed for high-contrast stylised renders. |
| Garage | Industrial environment with practical light ceiling source. |
| Interest | Lighting setup designed to create visual focal hierarchy. |
| Gobo | Studio with patterned light projection and shadow breakup. |
| 3D Scan | Camera volume and point cloud for photogrammetry or Gaussian Splatting. |
| Tracking | Optimised lighting for camera tracking and object isolation. |
| Light Box | Soft enclosed lighting environment for shadowless rendering. |
| Turntable | Setup with controlled rotational display environment. |
| Reveal | Dramatic reveal lighting with high contrast. |
| Mist | Atmospheric lighting with volumetric presence. |
| Chroma | Green-screen or chroma key setup. |
| Infinite | Seamless infinite backdrop setup. |
| Backplate | Studio configured for compositing over backplates. |
| Transparent | Rendering setup for alpha export. |
| MetaPortrait | Portrait-optimised lighting and framing. |
| World | Outdoor / HDRI-driven lighting environment. |
| Drawing | Flat, illustrative lighting setup for stylised output. |
Important notes
Atlux_Studio actor in the Outliner.This section determines which components are affected when applying a preset.
| Element | Function |
|---|---|
| All | Updates all components. |
| Studio | Updates room geometry and backdrop. |
| Light | Updates all lighting actors. |
| Camera | Updates camera placement and parameters. |
| Target | Updates camera focus/target actor. |
| Rig Rail | Updates light rig/rail systems. |
| Prop | Updates auxiliary studio props. |
| Post-P | Updates post-process settings (LUTs, grading). |
Afflatus is the curated randomisation system within Atlux Studio.
The name derives from Latin, meaning “an impulse of creative power or inspiration.”
This system generates new visual variations while maintaining aesthetic cohesion.
| Option | Function |
|---|---|
| Materials | Reassigns curated random materials to the studio. |
| Light Colours | Reassigns curated random light colours. |
These sliders control how variation is distributed.
| Parameter | Description |
|---|---|
| Curated Palette | Strength of curated colour harmony. Higher values produce more controlled colour theory. |
| Saturation | Overall colour intensity. |
| Fully White | Probability of pure white lighting/materials. |
| Material Type | Variation in surface material complexity. |
| Gobo | Probability of patterned light projection. |
| LUT | Probability of applying a post-process LUT. |
Save and reuse custom studio configurations.
Select a previously saved preset from the dropdown and click Apply.
Import an external preset file into the current project using Import and Load.
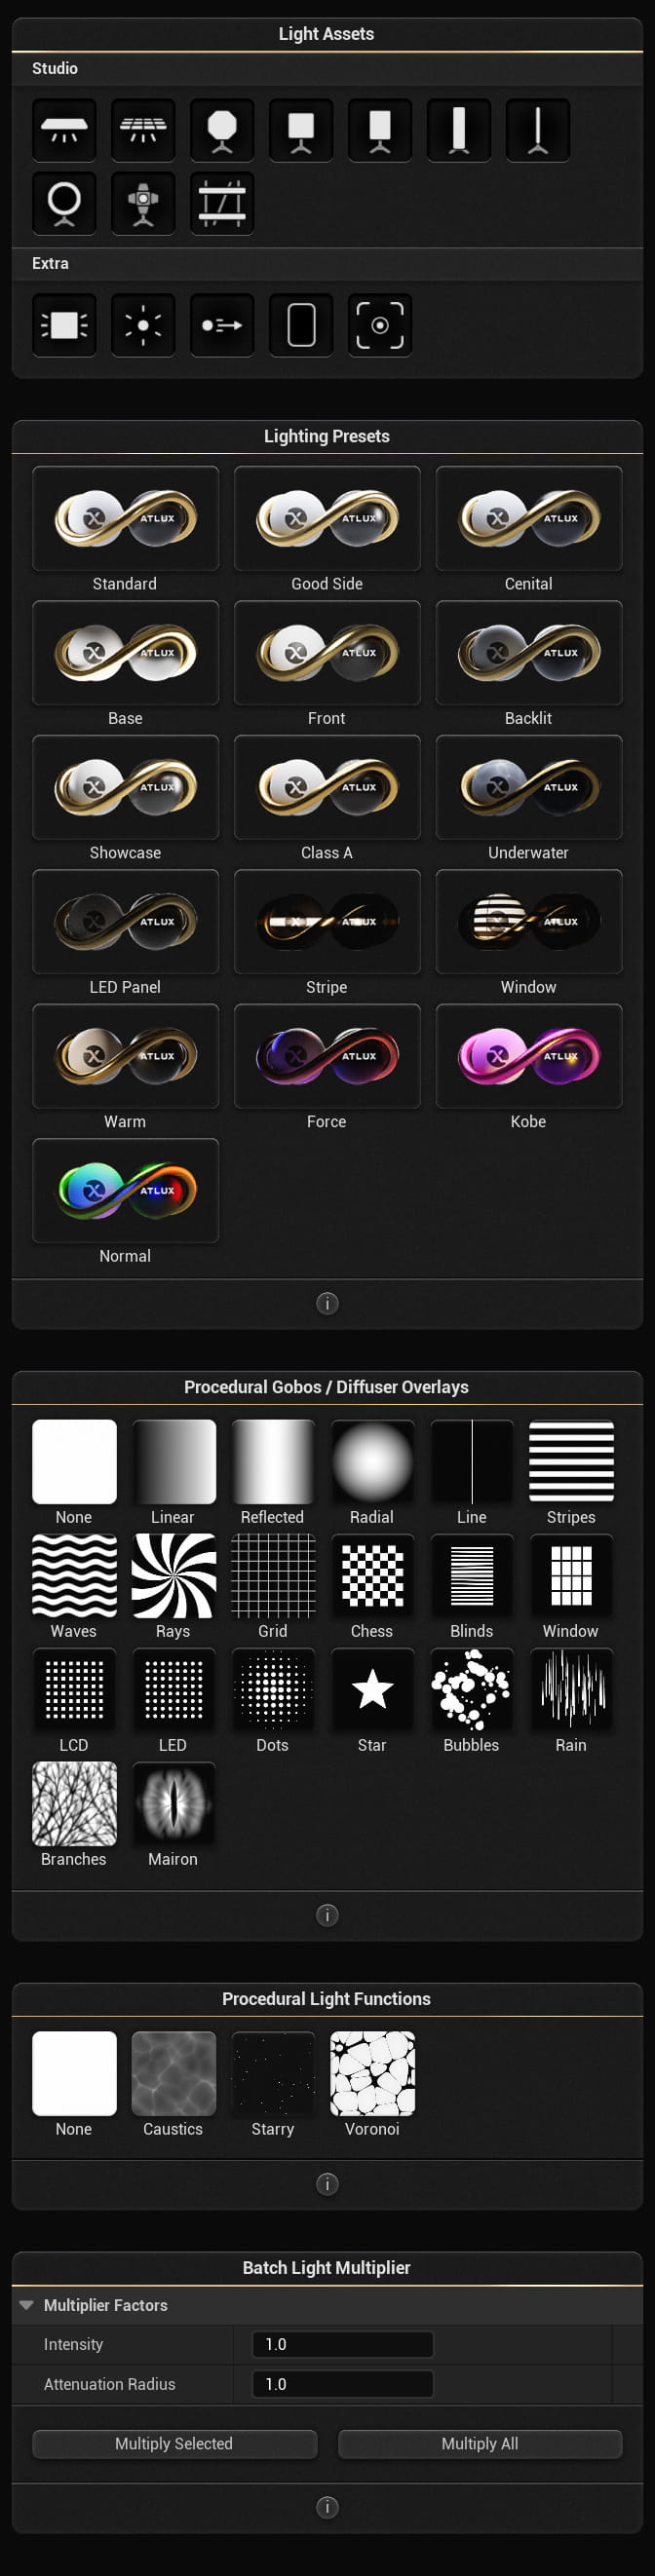
The Light Assets section provides quick access to the lighting actors you can add to the current studio. Drag and drop the icon into the level to spawn the corresponding light asset.
Core studio lighting assets for building common photo/film setups:
| Asset | Purpose |
|---|---|
| Light Bank | Large soft source for broad, even illumination and smooth shadow falloff. |
| Light Box | Large panel with framing and multiple light cells. |
| Softbox 70x70 (Octagonal) | Octagonal soft source producing rounded catchlights and soft wrap. |
| Softbox 60x60 | Compact square soft source for controlled diffusion and tighter highlights. |
| Softbox 50x70 | Rectangular soft source for slightly directional softness and shaped speculars. |
| Softbox 30x120 | Stripbox-style source for long, clean specular streaks and edge definition. |
| Light Wand | Long, narrow source for sweeping highlights, rim accents, and product specular shaping. |
| Ring Light | Near-axis soft source producing circular catchlights and low-shadow front illumination. |
| Spotlight | Focused cone light for hard/controlled shadows, projection effects, and precise accents. |
| Light Rail | Overhead rail system used to suspend lights in the air and manage hanging light positions. |
Utility assets for general lighting, control, and aiming:
| Asset | Purpose |
|---|---|
| Area Light | Rectangular emitter for soft shadows and controllable specular shape (general-purpose soft source). |
| Point Light | Omnidirectional emitter for small practicals, fills, and local highlights. |
| Directional Light | Infinite-distance light for sun-style illumination and strong directional shadows. |
| Flag | Control card used to block light (negative fill) or reflect a specific colour back into the scene. |
| Target | Helper target actor for lights to point at, enabling consistent aiming and easy re-framing. |
Tip
The Lighting Presets section lets you instantly reconfigure the lighting in the current studio using curated lighting setups.
Each preset updates the lights in the current studio. Custom Lighting Presets can be saved and loaded in the Studio tab under Custom Presets.
| Preset | Description |
|---|---|
| Standard | Balanced, general-purpose lighting for neutral presentation. |
| Good Side | Flattering angled key light with controlled fill for pleasing form and skin tones. |
| Cenital | Large softbox above the studio for even unidirectional lighting. |
| Base | Underlighting with a large softbox placed on the floor pointing upwards. |
| Front | Front-driven illumination that reduces shadows and increases readability. |
| Backlit | Strong rim/back light emphasis for separation and silhouette definition. |
| Showcase | Presentation-style lighting with enhanced highlights and controlled contrast. |
| Class A | High-end studio look: controlled banded speculars, elegant falloff, premium contrast. |
| Underwater | Stylised lighting with softened contrast and watery ambience. |
| LED Panel | Large, soft panel-like source for broad, even diffusion. |
| Stripe | Stripbox-inspired lighting for long, clean specular streaks and edge definition. |
| Window | Window-key look with directional softness and natural falloff. |
| Warm | Warmer colour temperature bias for inviting mood and golden highlights. |
| Force | High-impact contrast setup for dramatic shape and punchy speculars. |
| Kobe | Stylised preset with bold colour/contrast personality. |
| Normal | Multidirectional RGB-coloured setup. |
Important notes
The Procedural Gobos / Diffuser Overlays section applies procedural patterns to supported lights to shape and texture illumination.
Select an overlay to apply it to supported lights:
| Overlay | Effect |
|---|---|
| None | Removes the overlay from supported lights. |
| Linear | Smooth linear gradient for soft shaping and falloff. |
| Reflected | Mirrored gradient for symmetric shaping. |
| Radial | Radial gradient for vignette-like falloff. |
| Line | Single band for sharp directional breakup. |
| Stripes | Repeated stripes for patterned breakup. |
| Waves | Wavy breakup for organic motion/texture. |
| Rays | Radial rays for stylised “god ray” breakup. |
| Grid | Grid breakup for structured texture. |
| Chess | Checker breakup for bold patterning. |
| Blinds | Venetian-blind style bands for window-like shadows. |
| Window | Window-frame breakup pattern. |
| LCD | Dense pixel pattern for screen-like texture. |
| LED | Emitter-dot pattern for LED array texture. |
| Dots | Dot breakup for soft bokeh-like texture. |
| Star | Star-shaped cutout pattern. |
| Bubbles | Clustered circles for playful organic breakup. |
| Rain | Vertical streaks for rain-like breakup. |
| Branches | Organic branching shadows. |
| Moiron | The Lidless Eye of Mordor. |
How it works
The Procedural Light Functions section applies animated or textured light-function materials to supported lights.
| Function | Effect |
|---|---|
| None | Removes the light function from supported lights. |
| Caustics | Watery caustic-style projection for dynamic light texture. |
| Starry | Starfield-like speckle projection for ambience and sparkle. |
| Voronoi | Cellular Voronoi projection for stylised breakup and motion. |
Important notes
The Batch Light Multiplier section lets you scale multiple light parameters at once, either for the selected lights or for all lights in the scene.
| Factor | What it changes |
|---|---|
| Intensity | Multiplies the intensity of affected lights. |
| Attenuation Radius | Multiplies the attenuation radius (range) of affected lights (where applicable). |
Examples
2, a light with intensity 20 becomes 40.0.5, a light with intensity 30 becomes 15.
The Prop Presets section provides curated prop combinations that can be spawned instantly into the scene. These presets automatically create multiple coordinated elements to achieve a specific look or context.
| Preset | Description |
|---|---|
| VFX Reference | Spawns reference spheres, calibration objects, and scale elements for lighting and shading evaluation. |
| Magic | Creates stylised glowing or floating visual elements for cinematic or fantasy-style renders. |
| Exhibit | Presentation-style setup for showcasing products in a gallery or installation context. |
| Soft | Minimal and elegant prop arrangement focused on subtle forms and smooth composition. |
Note
These presets spawn props that can also be found individually in the sections below.
The Models section contains individual geometry assets that can be spawned into the studio. These are commonly used for scene construction, product presentation, and reference.
Prebuilt interior shells for contextual product placement or environmental rendering.
Curved, flat, patterned, or textured background surfaces used to define the visual space behind your subject. Includes clean studio backdrops, striped variations, patterned surfaces, and graphic backgrounds.
Display platforms in various shapes and styles (cylindrical, layered, sculptural, draped, etc.) used to elevate and frame products.
Simple stand-in meshes (e.g. basic objects, human scale figure, abstract shapes) used for composition planning and lighting tests.
Technical reference assets such as calibration spheres and colour charts for physically-based shading and lighting validation.
The Materials section contains curated shader presets that can be applied to selected props or models.
Neutral foundational materials such as matte, glossy, translucent, and coated surfaces. Ideal for clean product visualisation.
Physically-based metallic materials including polished, brushed, and tinted metals, along with a car paint shader. Designed for realistic reflections and specular highlights.
Soft surface materials with fabric-like shading and subsurface characteristics.
Stylised or procedural materials including complex shading networks and non-standard looks.
Utility materials for technical purposes such as UV visualisation or diagnostic shading.
Generates a UV checker texture to assist with UV validation and distortion detection.
The Curated Colour Palette provides a selection of harmonised colours designed to work well together in studio lighting conditions.
The Decals section contains projection-based surface details that can be applied to enhance realism or add storytelling elements.
Footprints, marks, surface wear patterns, and graphic overlays.
Subtle surface imperfections to break up clean renders and introduce realism.
The Effects section provides dynamic and particle-based visual enhancements.
Atmospheric particle systems such as floating dust, sparks, stylised bursts, and ambient particles.
Tip
For particles, set around 60 frames in Render Settings → Warm Up Count (Engine) to allow particles to initialise before rendering the first frame.
Animated light streaks and stylised motion trails used for dynamic compositions. Their path can be modified by editing their spline component.
The Fog section contains volumetric fog assets and global fog controls for atmospheric depth and light interaction.
Spawn different fog presets such as subtle haze, directional fog, layered fog, aurora-style effects, and dense volumetric atmospheres.
| Parameter | Description |
|---|---|
| Voxel Size | Controls the resolution of volumetric fog. Smaller values increase quality but may impact performance. |
Important notes
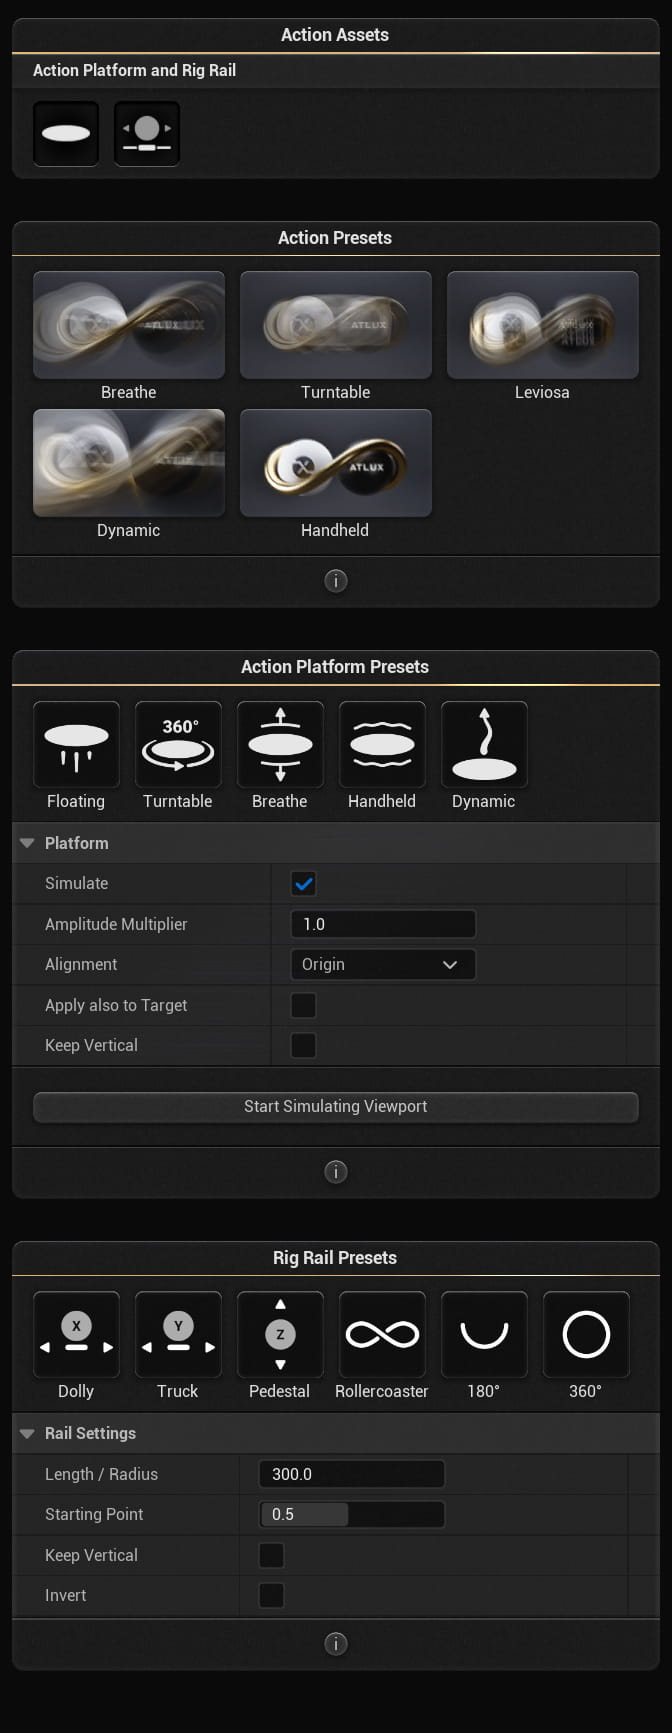
The Action Assets section allows you to spawn motion systems that can be applied to Actors, Cameras, Lights, or Atlux Samples.
| Asset | Description |
|---|---|
| Action Platform | A procedural motion platform that applies animated movement to an attached Actor or Camera. Ideal for floating, breathing, handheld, and turntable-style motion. |
| Rig Rail | A spline-based rail system used to animate Cameras, Lights, or other Actors along predefined motion paths. |
The Action Presets section provides ready-made motion behaviours. These presets spawn an Action Platform applied to either an Atlux Sample or a Camera to showcase different types of motion.
| Preset | Motion Style |
|---|---|
| Breathe | Subtle up-and-down scale motion to simulate natural breathing or soft idle movement. |
| Turntable | Continuous 360° rotation for product showcase and evaluation. |
| Leviosa | Stylised floating motion with gentle drift and lift. |
| Dynamic | More energetic movement pattern for cinematic or high-impact presentation. |
| Handheld | Simulated handheld camera movement with subtle jitter and drift. |
Important notes
The Action Platform Presets section lets you apply procedural motion to any selected Actor.
| Preset | Description |
|---|---|
| Floating | Vertical oscillation for levitating-style motion. |
| Turntable | Rotational motion around a central axis. |
| Breathe | Rhythmic scaling movement. |
| Handheld | Organic noise-based motion simulating handheld movement. |
| Dynamic | Stronger, more pronounced movement pattern. |
| Setting | Description |
|---|---|
| Simulate | Enables real-time simulation of the motion in the viewport. |
| Amplitude Multiplier | Scales the strength of the motion effect. |
| Alignment | Determines pivot alignment (e.g., Origin or custom alignment). |
| Apply also to Target | Applies the same motion to an attached Target actor (if present). |
| Keep Vertical | Keeps the object vertically aligned during motion. |
Usage notes
The Rig Rail Presets section provides spline-based motion paths for Cameras, Lights, Targets, or any Actor.
| Preset | Description |
|---|---|
| Dolly | Linear forward/backward motion along the X axis. |
| Truck | Linear side-to-side motion along the Y axis. |
| Pedestal | Vertical up-and-down motion along the Z axis. |
| Rollercoaster | Complex looping spline path for dynamic movement. |
| 180° | Half-circle arc path around a subject. |
| 360° | Full circular path around a subject. |
| Setting | Description |
|---|---|
| Length / Radius | Controls the size of the rail path. |
| Starting Point | Sets the starting position along the spline (0–1 range). |
| Keep Vertical | Maintains vertical orientation during movement. |
| Invert | Reverses the direction of travel. |
Important notes
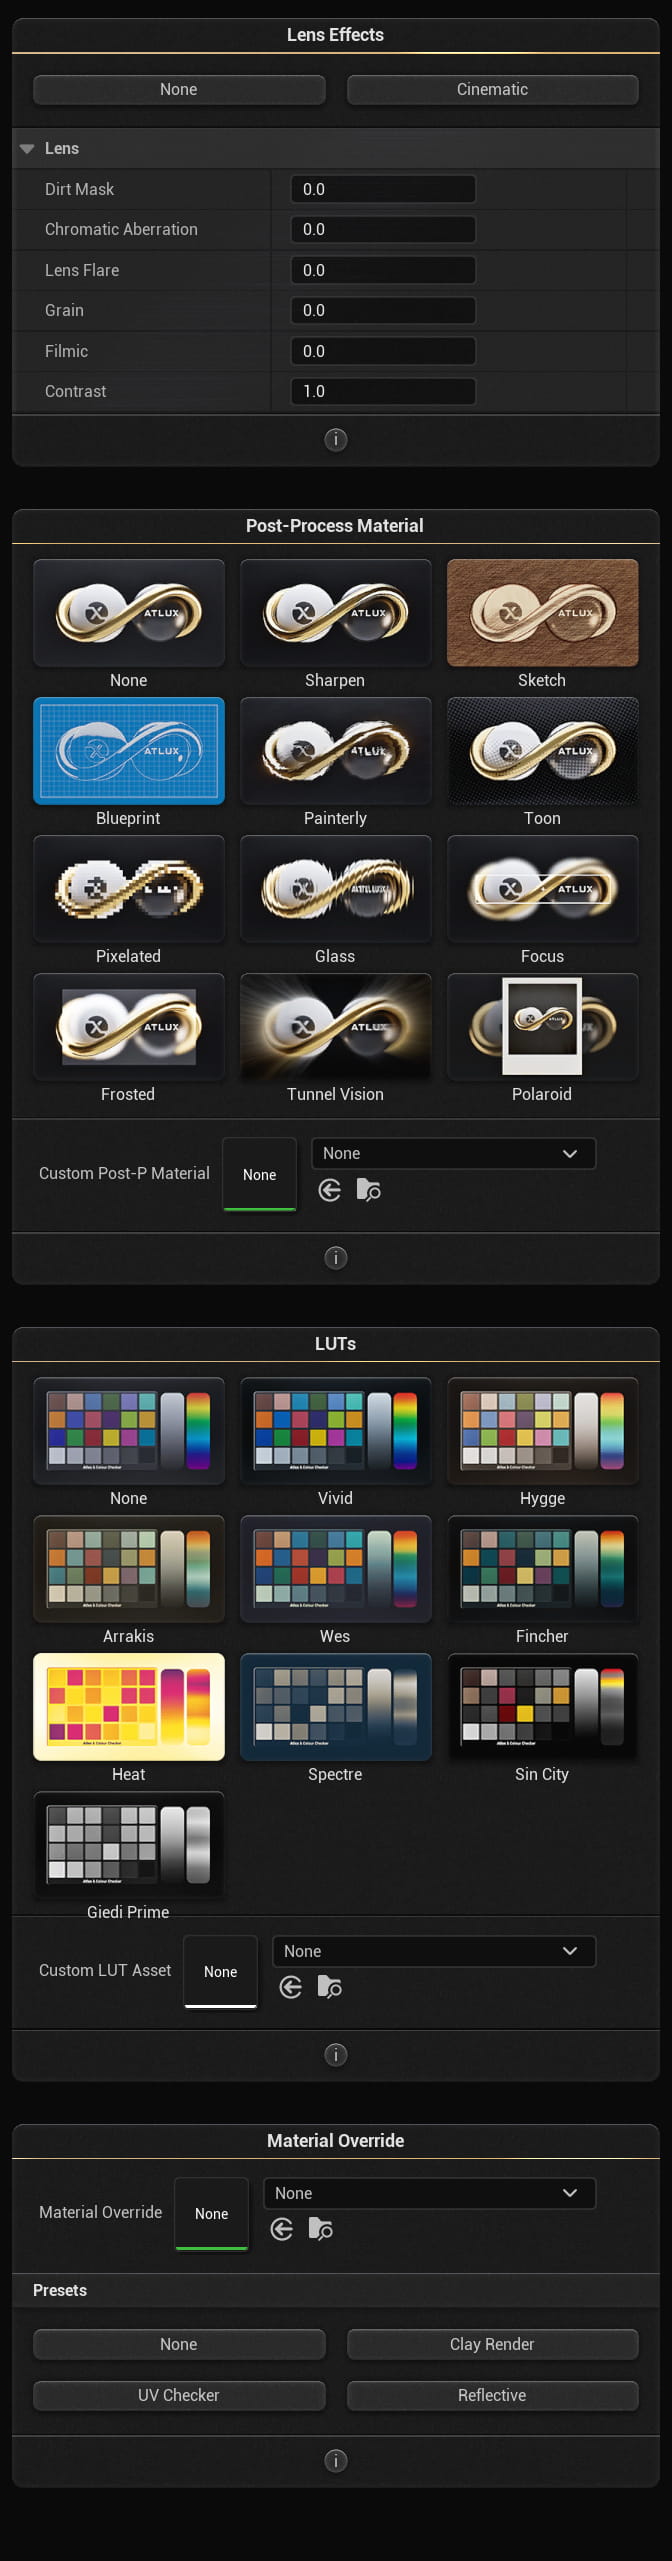
The Lens Effects section applies camera-style lens artefacts and finishing controls. These settings are intended to be lightweight, art-directable, and easy to toggle per look.
Use the preset buttons to quickly switch lens effect profiles: None disables lens effects, while Cinematic enables a film-style baseline.
| Parameter | Description |
|---|---|
| Dirt Mask | Adds a dust/dirty-lens overlay. The effect is driven by bloom and lens flare intensity. |
| Chromatic Aberration | Adds subtle colour fringing near high-contrast edges, increasing towards the image borders. |
| Lens Flare | Adds a visual flare effect from bright light sources, simulating light hitting the lens. |
| Grain | Adds film grain / noise to the image. |
| Filmic | Film-style tonemapping bias that reduces contrast by lowering highlights and lifting the darkest areas. |
| Contrast | Adjusts overall contrast of the image. |
Notes
Post-Process Materials apply stylised or technical screen-space effects to the rendered scene. These presets are automatically applied to the Post Process Volume in the level.
| Preset | Effect |
|---|---|
| None | Disables post-process material effects. |
| Sharpen | Enhances edge definition and micro-contrast. |
| Sketch | Stylised sketch/linework look. |
| Blueprint | Blueprint-style overlay with technical linework aesthetic. |
| Painterly | Brush-like stylisation for an illustrative finish. |
| Toon | Cartoon shading with simplified tones and edges. |
| Pixelated | Pixelation / mosaic effect for retro or stylised output. |
| Glass | Refractive/distortion look as if viewed through glass. |
| Focus | Focus / attention effect (stylised emphasis and falloff). |
| Frosted | Frosted-glass diffusion with softened detail. |
| Tunnel Vision | Vignette/tunnel-style mask focusing towards the center. |
| Polaroid | Instant-film / polaroid-style framing and grading effect. |
Use Custom Post-P Material to select a user-provided post-process material asset. This enables custom looks beyond the built-in preset library.
Important notes
The LUTs section applies colour grading lookup tables to the scene. Use LUTs to quickly shift mood, contrast, and palette without changing lighting or materials.
| LUT | Description |
|---|---|
| None | No LUT is applied. |
| Vivid | Increased colour intensity and punch. |
| Hygge | Warm, cosy grading with gentle contrast. |
| Arrakis | Dry, desert-inspired tonal bias. |
| Wes | Stylised palette with controlled saturation and film-like balance. |
| Fincher | Cooler, moodier grading with restrained highlights. |
| Heat | Hot, inverted warm-biased grading with strong colour energy. |
| Spectre | Muted, clean cinematic grading. |
| Sin City | High-contrast monochrome / near-monochrome look. |
| Giedi Prime | Industrial, desaturated and heavy mood grading. |
With Atlux you can import .cube files (LUTs) into the Unreal Content Browser and load them here.
Material Override temporarily replaces materials in the scene during Rendering or Play/Simulation to generate technical passes or lookdev views.
Choose an override material from the dropdown to enable it. This does not permanently change materials in the level.
| Preset | Use |
|---|---|
| None | Disables material override. |
| UV Checker | Applies a UV checker material to evaluate UV layout and distortion. |
| Clay Render | Applies a neutral clay material for pure lighting evaluation. |
| Reflective | Applies a highly reflective material to analyse reflections and highlight flow. |
Important notes
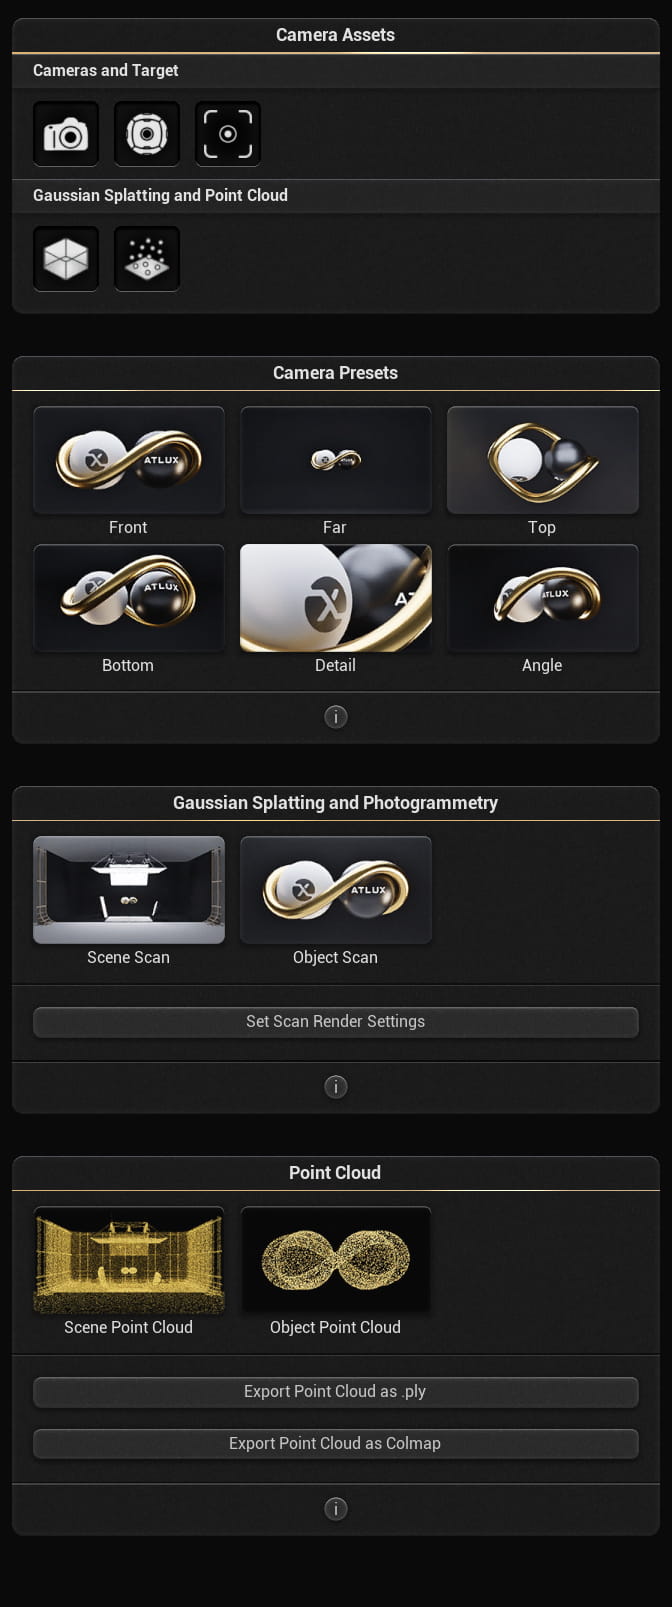
The Camera Assets section spawns the core capture tools: Cameras, Targets, and scanning volumes used for visualisation, Gaussian Splatting, photogrammetry, and point cloud generation.
| Asset | Description |
|---|---|
| Camera | Spawns an Atlux DSLR camera actor. |
| 360 Camera | Spawns a 360 camera for equirectangular rendering. |
| Target | Spawns a target actor that the camera (and other actors) can look at for consistent framing. |
| Asset | Description |
|---|---|
| Camera Volume | Spawns a camera volume used to generate multiple camera viewpoints for scanning pipelines (Gaussian Splatting / photogrammetry). |
| Point Cloud Volume | Spawns a point cloud volume used to scan meshes in the scene and generate a point cloud representation. |
The Camera Presets section provides quick framing presets that modify the location of the camera in the studio.
| Preset | Framing |
|---|---|
| Front | Places the camera in front of the subject for a standard hero view. |
| Far | Moves the camera back to capture a wider view of the subject and environment. |
| Top | Moves the camera above the subject for a top-down view. |
| Bottom | Moves the camera below the subject for a low-angle view. |
| Detail | Moves the camera closer for macro/detail framing. |
| Angle | Moves the camera to an angled 3/4 position for depth and form. |
Note
These presets modify the location of the Camera.
This section automates capture for external reconstruction workflows by generating: images plus COLMAP data for Gaussian Splatting and photogrammetry pipelines.
| Preset | Use |
|---|---|
| Scene Scan | Configures scan volumes and capture behaviour for scanning an entire environment. |
| Object Scan | Configures scan volumes and capture behaviour for scanning a single subject or object. |
Applies required render settings for 3D scanning capture, including naming conventions, disabling Motion Blur, selecting file formats, and configuring the Denoiser.
Workflow
cameras.txt, images.txt, points3D.txt) are saved alongside the images in the Scan folder.Quality controls
The Point Cloud section spawns and manages point cloud generation directly inside Unreal Engine. It creates a point cloud representation of the scene or a selected object region.
| Preset | Description |
|---|---|
| Scene Point Cloud | Spawns a Point Cloud Volume and scans the scene to generate a point cloud. |
| Object Point Cloud | Spawns a Point Cloud Volume configured for a tighter object-focused scan. |
Important notes
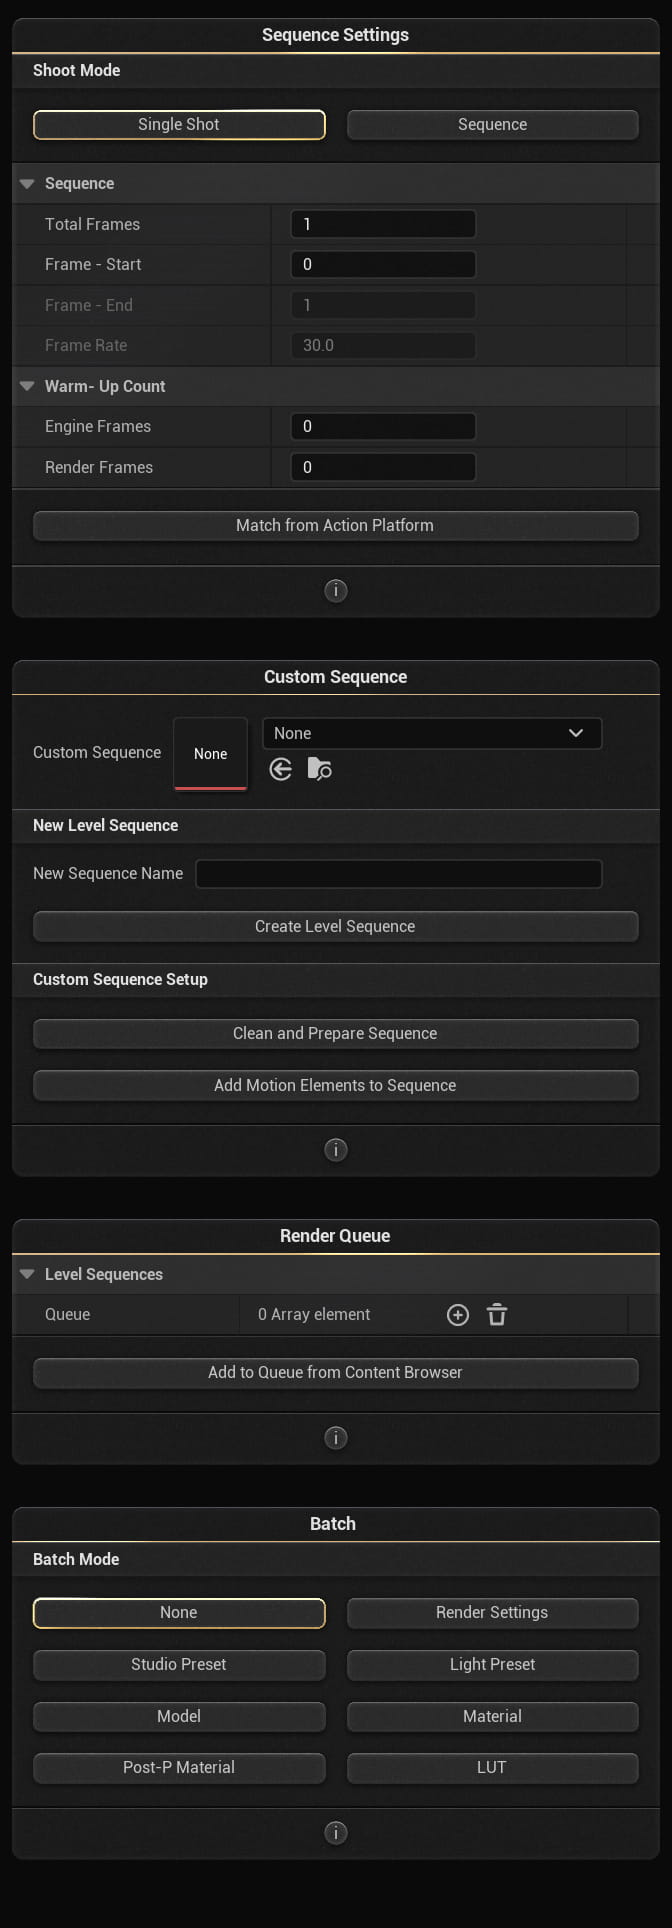
The Sequence Settings section controls how sequences are generated and rendered when using the Shoot button, and when creating new custom Level Sequences.
Choose whether the Shoot button renders a single frame or a full sequence.
| Mode | Description |
|---|---|
| Single Shot | Renders one frame using the current camera and render settings. |
| Sequence | Renders a frame range using the sequence settings below. |
| Parameter | Description |
|---|---|
| Total Frames | Total number of frames in the rendered sequence. |
| Frame - Start | Start frame index (inclusive). |
| Frame - End | End frame index (exclusive). The end frame is excluded from the sequence. |
| Frame Rate | Frames per second for the sequence timing. |
End frame is excluded
If Frame - Start is 0 and Frame - End is 10,
only frames 0 to 9 are rendered (10 frames total).
Warm-up frames are used to stabilise temporal effects before the first rendered frame. This can improve motion blur consistency and allow particle systems to initialise.
| Parameter | Description |
|---|---|
| Engine Frames | Pre-roll simulation frames before rendering begins. |
| Render Frames | Additional warm-up frames rendered (useful for some temporal pipelines). |
Automatically matches the sequence duration to looping Action Platforms (e.g. Turntable, Floating), calculates the required frame count, and applies the right amount of warm-up frames for seamless looping.
The Custom Sequence section lets you select or create a Level Sequence and configure it for Atlux rendering. When a Custom Sequence is set, it overrides the automated sequence used by the Shoot button.
Choose an existing Level Sequence from the dropdown. Use the refresh/open icons to reload or access it quickly.
Creating a new sequence generates a new sequence asset using the Sequence Settings from above. It also adds the selected camera and motion components in the scene (when applicable).
| Action | What it does |
|---|---|
| Clean and Prepare Sequence | Removes existing elements from the sequence and adds only the camera. Also applies the current Sequence Settings (frames, rate, warm-up) to the sequence. |
| Add Motion Elements to Sequence | Adds Rig Rails to the sequence, keeping the start/end frame and using the interpolation mode selected in the details panel of each rail. |
Action Platforms vs Sequencer
The Render Queue section lets you render multiple Level Sequences one after another. When the queue is empty, the Shoot button renders the automated sequence (or the selected Custom Sequence).
Add Level Sequences to the queue to render them sequentially.
Note
The Batch section automates multi-render workflows by rendering the same scene multiple times with different variations (presets, materials, post, or render settings).
Select the type of variation you want to batch render:
| Mode | Description |
|---|---|
| None | No batch rendering. Shoot renders a single output (shot or sequence). |
| Render Settings | Renders the same shot/sequence multiple times with different render setting presets (e.g. resolution, quality). |
| Studio Preset | Applies selected Studio Presets per render (backdrop, lights, props, post-process, etc.). Tip: set the preset to Afflatus to generate a random studio per batch render. |
| Light Preset | Applies selected Light Presets per render, changing only lights. Tip: set the preset to Afflatus to generate random lights per batch render. |
| Model | Renders a series of meshes/actors using the same studio. |
| Material | Renders a queue of materials applied to a selected actor or mesh in the scene. |
| Post-P Material | Renders the same scene with multiple Post-Process Materials. |
| LUT | Renders the same scene with multiple LUTs. |
Tip
Batch modes are ideal for look exploration, approvals, and dataset generation. Keep camera and framing locked while varying only the intended category (lights, post, materials, etc.).
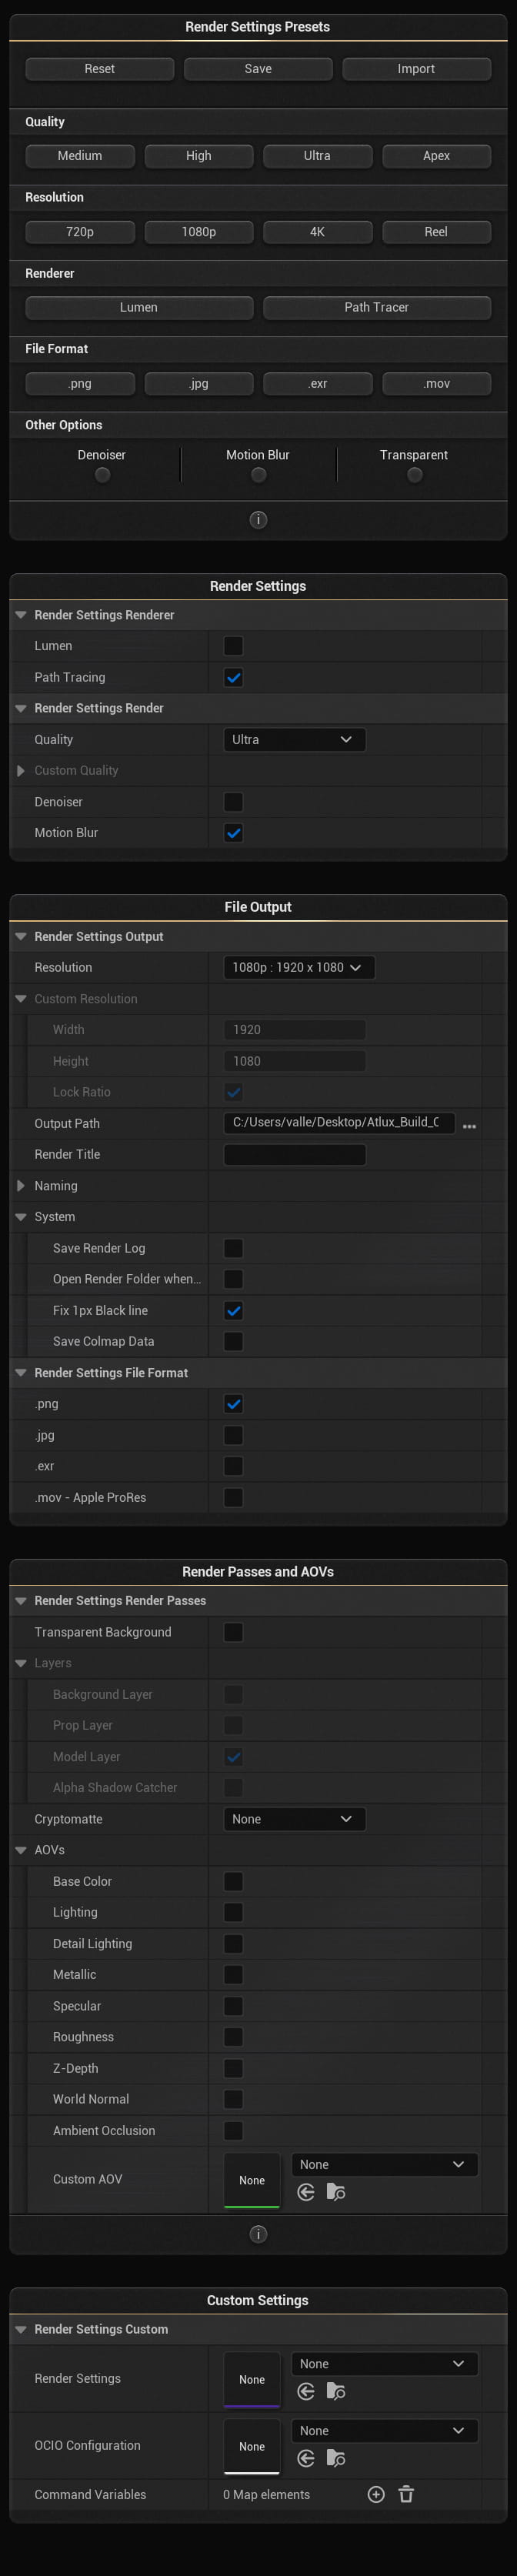
The Render Settings Presets section provides one-click presets that configure the render settings used by the Shoot button. Presets can be saved and imported for consistent pipelines across projects.
Sets the overall render quality preset used during rendering, affecting the render samples.
Selects the output resolution preset.
Selects the rendering pipeline.
Selects the output file format.
| Option | Description |
|---|---|
| Denoiser | Enables denoising (especially useful for Path Tracer). May affect sharpness/fine detail. |
| Motion Blur | Enables motion blur during sequence rendering. |
| Transparent | Enables transparency/alpha output (where supported by the chosen renderer and format). |
Note
The Render Settings section shows and edits the active render configuration that will be used by the Shoot button. It mirrors the preset controls, but exposes the underlying settings directly.
Select a quality level, or enable custom quality controls (when available).
The File Output section controls output resolution, output location, naming, and saved metadata.
Select a resolution preset or specify a custom resolution.
| Setting | Description |
|---|---|
| Resolution | Choose from predefined presets (e.g. 1080p) for fast setup. |
| Custom Resolution (Width / Height) | Manual pixel resolution for exact output requirements. |
| Lock Ratio | Keeps the aspect ratio consistent when changing width/height. |
Sets the directory where renders are saved. The plugin can automatically open the output folder when rendering finishes (depending on your system options).
Optional title or label that can be embedded or displayed in outputs (pipeline-dependent).
Controls the naming convention for renders. This is especially important for dataset generation and scanning workflows.
| Option | Description |
|---|---|
| Save Render Log | Saves a log file with render settings and job information. |
| Open Render Folder when done | Opens the output directory after rendering completes. |
| Fix 1px Black line | Applies a correction for a 1-pixel black edge that can appear in some outputs. |
| Save Colmap Data | Saves COLMAP files alongside the rendered images (used for scanning workflows). |
Select one or more output formats (depending on your configuration).
The Render Passes and AOVs section controls additional outputs such as layers and rendering passes, used for compositing and technical pipelines.
Outputs alpha transparency in supported formats and configurations.
Enables layer-based rendering outputs. Available layers include: Background Layer, Prop Layer, Model Layer, and Alpha Shadow Catcher (when enabled).
Enables Cryptomatte output (ID mattes for compositing). Typically requires .exr.
Outputs additional render passes such as Base Color, Lighting, Detail Lighting, Metallic, Specular, Roughness, Z-Depth, World Normal, and Ambient Occlusion.
Select a custom AOV from a dropdown (including Post-Process Materials, when supported) to generate an additional output pass.
Important notes
The Custom Settings section provides hooks for pipeline integration and advanced configuration.
| Setting | Description |
|---|---|
| Render Settings | Select a custom render settings asset/preset to apply. |
| OCIO Configuration | Select an OpenColorIO configuration for colour management (when used in your pipeline). |
| Command Variables | Adds custom variables/arguments to the render command. Useful for automation, naming, pipeline flags, or batch processing. |
Tip
Use Custom Settings to standardise renders across teams (shared OCIO and render settings), and to attach pipeline metadata for automated ingest.
Keyboard shortcuts and Placement Mode for an easier shot setup.
Placement Mode is automatically activated when dragging a new asset from Atlux's interface. You can also activate it for any existing actor (including your own meshes) by selecting it and pressing Space.
Tip
Placement Mode is ideal for fast blocking: drop props, position lights, and adjust camera framing without switching tools.
Light Painting behaves like Placement Mode, but includes extra controls specific to lights. It activates when dragging a new light from Atlux's interface, or by selecting an existing light and pressing Space.
Tip
Light Painting is best for rapid look-dev: place a key light with the cursor, dial intensity, then refine scale and rotation without leaving the viewport.
The runtime version of Atlux, with automated desktop app packaging.
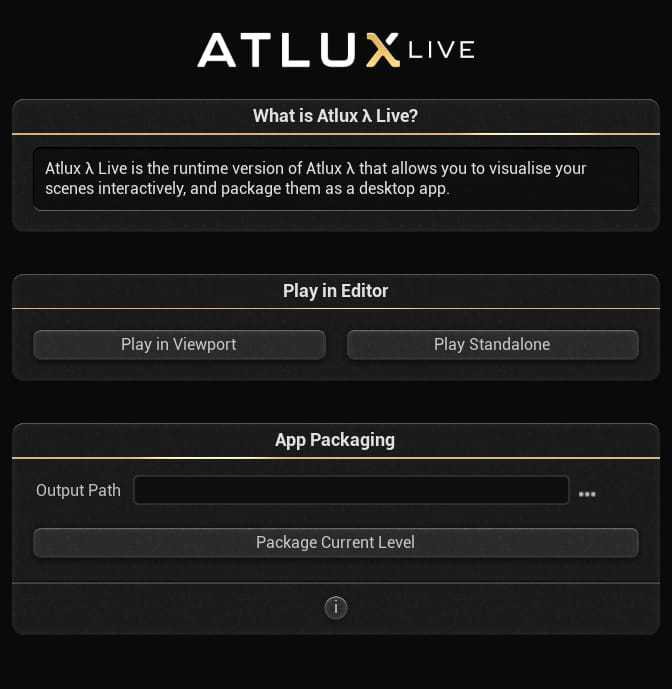
Atlux Live is the runtime version of Atlux. It allows you to visualise your scenes interactively outside of the editor and package them as a standalone desktop application.
Purpose
This section allows you to preview Atlux Live directly inside Unreal Editor before packaging.
| Option | Description |
|---|---|
| Play in Viewport | Launches Atlux Live inside the current Unreal viewport. Useful for quick iteration and testing. |
| Play Standalone | Launches Atlux Live in a separate standalone window. Simulates the behaviour of the packaged desktop application. |
Tip
Use Play Standalone when testing input, resolution, DPI scaling, and window behaviour before packaging.
The App Packaging section allows you to package the current level as a desktop application using Atlux Live.
Select the directory where the packaged application will be generated.
Use the browse button (...) to choose a location.
Packages the currently open level into a desktop application configured to run with Atlux Live.
Important behaviour during packaging
Workflow

This row controls camera creation. It allows you to build and manage interactive camera states inside Atlux Live.
Displays the different cameras saved. Click on them to teleport.
Stores the current camera transform and settings into the camera list.
Deletes the currently selected saved camera.

This row controls the basic orbit behaviour and navigation system.
Distance from the orbit centre.
XYZ position of the pivot point.
Rotation offset of the orbit.
Adds procedural camera shake.

Controls physical camera parameters and optical behaviour.

Provides quick access to predefined studio environments and lighting setups.
Changes the full environment setup including backdrop, props, and lighting configuration.
Updates only the lighting configuration while keeping the current studio intact.

Adds procedural animation to the model or camera.
Restores motion values to their default state.

Applies visual effects and color grading to the rendered output.
Applies stylised rendering filters such as Sharpen, Sketch, Blueprint, etc.
Applies curated color grading profiles to adjust mood and tone.
Switches between standard and cinematic lens behaviours.

Controls resolution, quality, sampling, and rendering behaviour.
Choose from preset resolutions (720p, 1080p, 4K, Reel, Square) or define a custom size.
Select rendering quality (Medium, High, Ultra, Apex).
Controls the number of rendering samples for Path Tracing.
Selects the rendering engine used in the viewer and for the final output.
Real-time global illumination renderer optimized for interactive performance.
Physically accurate offline renderer for high-quality final output.